|
SETUP SECONDARY AND THIRD FUNCTIONS

When all functions from CLICK 1 to B - S.POP has been scrolled though the
2.FUNC LED will be reached and ProCue 1m1 goes into secondary functions SETUP
mode. It is also possible to access the 2.FUNC setup mode by pressing the setup
switch twice.
The 2.FUNC LED and the SETUP LED will blink slowly and one of the two first
LEDs (CLICK 1 or CLICK 2) will be solid lit indicating if the first secondary
function is on or off.
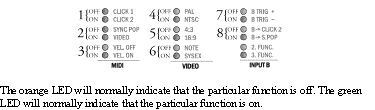
All secondary functions will be assigned a pair of LEDs - an orange and a green.
The picture below shows how the LEDs on the front works in pairs for the secondary
and third function setup modes. The numbers from one to eight indicates the number
of the secondary or third function. The printed LED names on the front panel have
nothing to do with the secondary or third functions.
|

 1
2
3
4
5
6
7
8
9
10
11
12
13
14
15
16
17
18
19
20
21
22
23
24
25
1
2
3
4
5
6
7
8
9
10
11
12
13
14
15
16
17
18
19
20
21
22
23
24
25